Step
1: Select The Brush Tool
To access any of the brush dynamics,
we'll need to open Photoshop's Brushes panel. First, make sure you have the Brush
Tool selected from the Tools panel, or press the letter B to quickly
grab it with the keyboard shortcut:
Step
2: Open The Brushes Panel
With the Brush Tool selected, the
easiest way to open the Brushes panel is to either press the F5 key on
your keyboard (press it again to close the Brushes panel) or click on the
Brushes panel toggle icon in the Options Bar at the top of the screen
(click it again to close the panel):
By default, the Brushes panel opens
to the Brush Presets options (you'll see the words Brush Presets
highlighted in blue in the top left corner of the panel). In this mode, all we
can do is choose from a list of ready-made brushes on the right side of the
panel. To choose any of the brushes, simply click on its thumbnail in the list.
If you have Tool Tips enabled in Photoshop's Preferences, the name of each
brush will appear as you hover your mouse cursor over the thumbnails. A helpful
preview area along the bottom of the panel shows us what a brush stroke would
look like with the currently selected brush. We can use the Master Diameter
slider below the list of brushes to change the size of the brush. If all you
want to do is choose a brush and paint with it, this is the place to be:
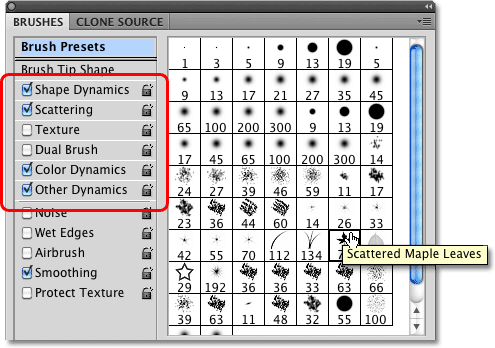
Each of the brush presets in the
list on the right side of the panel comes with both a brush tip (the actual
shape of the brush that we see in the brush's thumbnail) and a pre-selected
collection of brush dynamics that control the behavior of the brush as we paint
with it. The six categories of brush dynamics (Shape Dynamics, Scattering,
Texture, etc.) are found along the left side of the Brushes panel, and if you
keep an eye on them as you click on different brush thumbnails, you'll see that
different categories turn on and off depending on which brush you select. For
example, if I click on the Scattered Maple Leaves brush, we can see that Shape
Dynamics, Scattering, Color Dynamics, and Other Dynamics are all enabled with
the brush tip

However, if I choose a more basic
brush, like one of Photoshop's standard round brushes from the top of the list,
only the Shape Dynamics category is selected. In fact, depending on whether or
not you have a pen tablet installed on your computer, you may not see any brush
dynamics categories selected at all:
Let's take a look at how we can
change the options in each category and how they affect the behavior of our
brush, starting with the first one in the list - Shape Dynamics.
Or, jump to any of the other Brush Dynamics
categories using the links below:
- Scattering
- Texture
- Dual Brush
- Color Dynamics
- Other Dynamics


No comments:
Post a Comment